前言
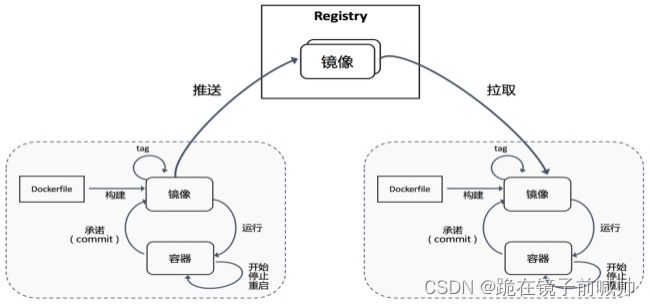
轻量级虚拟化的容器技术具有举足轻重的推动作用。其实很早之前,容器技术已经有所应用,而 Docker 的出现和兴起彻底带火了容器。其关键因素是 Docker 提供了使用容器的完整工具链,使得容器的上手和使用变得非常简单。工具链中的一个关键,就是定义了新的软件打包格式-容器镜像。镜像包含了软件运行所需要的包含基础 OS 在内的所有依赖,推送至运行时可直接启动。从镜像构建环境到运行环境,镜像的快速分发成为硬需求。同时,大量构建以及依赖的镜像的出现,也给镜像的维护管理带来挑战。镜像仓库的出现成为必然。

自己在本地搭建一套镜像仓库:Harbor。上传和下载镜像。
1、确保目标主机满足Harbor安装前提条件
因Harbor依赖的服务较多,部署成本较高,随着容器化服务的应用,Harbor部署基本封装到容器化,因此需要容器化相关环境支持。
安装需求:https://goharbor.io/docs/2.5.0/install-config/installation-prereqs/
Docker文档:https://docs.docker.com/engine/install/centos/
## Docker for CentOS 7
sudo -s
yum remove docker  docker-common docker-selinux docker-engine
yum install -y yum-utils device-mapper-persistent-data lvm2
yum-config-manager --add-repo http://mirrors.aliyun.com/docker-ce/linux/centos/docker-ce.repo
yum list docker-ce --showduplicates | sort -r
yum install -y docker-ce docker-compose containerd

systemctl start docker
systemctl enable docker

docker version
2、下载harbor上传主机
https://github.com/goharbor/harbor/releases
3、配置HTTPS证书
如果有官方签发的证书,则用官方证书,例如 Let’s Encrypt
推荐使用官方证书,否则容易浏览器告警
也可以使用自签名证书
# MyDomain=harbor.quwenqing.com
## 生成CA证书
# openssl genrsa -out ca.key 4096
# openssl req -x509 -new -nodes -sha512 -days 3650
 -subj "/C=CN/ST=Beijing/L=Beijing/O=example/OU=Personal/CN=${MyDomain}"
 -key ca.key
 -out ca.crt
## 生成服务器证书
# openssl genrsa -out ${MyDomain}.key 4096
# openssl req -sha512 -new
    -subj "/C=CN/ST=Beijing/L=Beijing/O=example/OU=Personal/CN=${MyDomain}"
    -key ${MyDomain}.key
    -out ${MyDomain}.csr
## 生成 x509 v3 扩展文件
## 无论您是使用 FQDN 还是 IP 地址连接到您的 Harbor 主机,您都必须创建此文件,以便为您的 Harbor 主机生成符合主题备用名称 (SAN) 和 x509 v3 的证书扩展要求。替换 DNS 条目以反映您的域。
# cat > v3.ext <<-EOF
authorityKeyIdentifier=keyid,issuer
basicConstraints=CA:FALSE
keyUsage = digitalSignature, nonRepudiation, keyEncipherment, dataEncipherment
extendedKeyUsage = serverAuth
subjectAltName = @alt_names

[alt_names]
DNS.1=quwenqing.com
DNS.2=quwenqing
DNS.3=hostname
EOF
# openssl x509 -req -sha512 -days 3650
    -extfile v3.ext
    -CA ca.crt -CAkey ca.key -CAcreateserial
    -in ${MyDomain}.csr
    -out ${MyDomain}.crt
## 配置证书到Harbor和Docker
## 在Harbor主机复制证书到H'a'r'b'o'r证书目录
# cp ${MyDomain}.crt /data/cert/
# cp ${MyDomain}.key /data/cert/
## 转换crt为cert,提供给Docker使用,Docker 守护进程将 .crt 文件解释为 CA 证书,将 .cert 文件解释为客户端证书。
# openssl x509 -inform PEM -in ${MyDomain}.crt -out ${MyDomain}.cert
# mkdir -p /etc/docker/certs.d/${MyDomain}/
# cp ${MyDomain}.cert /etc/docker/certs.d/${MyDomain}/
# cp ${MyDomain}.key /etc/docker/certs.d/${MyDomain}/
# cp ca.crt /etc/docker/certs.d/${MyDomain}/
## 如果Nginx监听非443端口,Docker证书目录格式为:/etc/docker/certs.d/${MyDomain}:${port}
# systemctl restart docker
## 运行prepare脚本启用HTTPS服务
# ./prepare

/etc/docker/certs.d/
    └── yourdomain.com:port
       ├── yourdomain.com.cert  <-- Server certificate signed by CA
       ├── yourdomain.com.key   <-- Server key signed by CA
       └── ca.crt               <-- Certificate authority that signed the registry certificate
4、配置Harbor YML文件
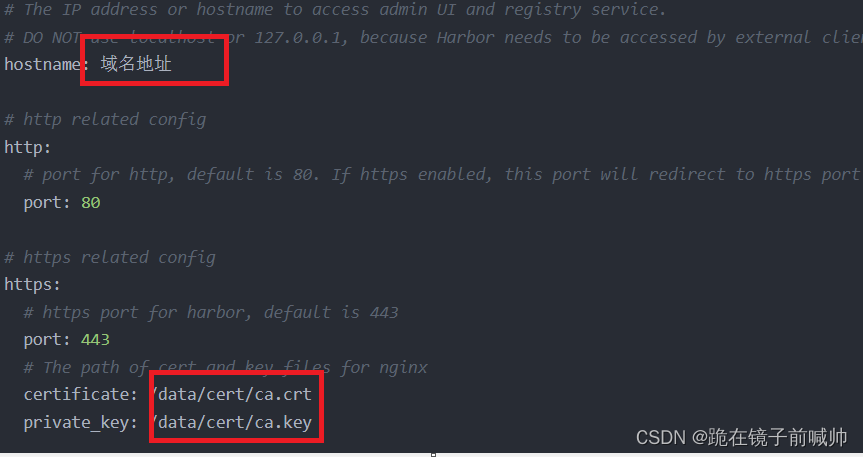
# cp harbor.yml.tmpl harbor.yml
# vi harbor.yml
配置harbor相关选项
6、运行安装程序脚本
# ./install.sh7、测试命令登陆仓库
# docker login 仓库地址
如果出现报错:
Error response from daemon: Get "https://仓库地址/v2/": x509: certificate relies on legacy Common Name field, use SANs instead解决
安装docker后不一定有/etc/docker/daemon.json文件,手动创建一个进行编辑
{"insecure-registries": [
    "${MyDomain}"
  ]}
保存退出后重启docker和执行./install.sh
8、设置harbor服务自启动
当部署Harbor的服务器在重启之后,可能会出现Harbor无法跟随系统自启动
解决方案
现假设Harbor的安装目录位置为/usr/local/harbor,在Harbor安装完成之后,在此目录下会生成docker-compose.yml配置文件,可以使用docker-compose操作此文件来控制Harbor的启停。
接下来编写自启Harbor的systemd服务,命名为harbor.service(放置于/etc/systemd/system目录下):
[Unit]
Description=harbor
After=docker.service systemd-networkd.service systemd-resolved.service
Requires=docker.service
Documentation=https://goharbor.io/docs/2.5.0/

[Service]
Type=simple
Restart=on-failure
RestartSec=5
ExecStart=/usr/bin/docker-compose -f /usr/local/harbor/docker-compose.yml start
ExecStop=/usr/bin/docker-compose -f /usr/local/harbor/docker-compose.yml stop

[Install]
WantedBy=multi-user.target
# chmod 644 /etc/systemd/system/harbor.service
# systemctl enable harbor
# systemctl start harbor
9、通过helm部署高可用Harbor
https://goharbor.io/docs/2.5.0/install-config/harbor-ha-helm/
Prerequisites
- Kubernetes cluster 1.10+
- Helm 2.8.0+
- High available ingress controller (Harbor does not manage the external endpoint)
- High available PostgreSQL 9.6+ (Harbor does not handle the deployment of HA of database)
- High available Redis (Harbor does not handle the deployment of HA of Redis)
- PVC that can be shared across nodes or external object storage
Troubleshooting Harbor Installation
The following sections help you to solve problems when installing Harbor.
Access Harbor Logs
By default, registry data is persisted in the host’s /data/ directory. This data remains unchanged even when Harbor’s containers are removed and/or recreated, you can edit the data_volume in harbor.yml file to change this directory.
In addition, Harbor uses rsyslog to collect the logs of each container. By default, these log files are stored in the directory /var/log/harbor/ on the target host for troubleshooting, also you can change the log directory in harbor.yml.
Harbor Does Not Start or Functions Incorrectly
If Harbor does not start or functions incorrectly, run the following command to check whether all of Harbor’s containers are in the Up state.
sudo docker-compose ps
        Name                     Command               State                    Ports
  -----------------------------------------------------------------------------------------------------------------------------
  harbor-core         /harbor/start.sh                 Up
  harbor-db           /entrypoint.sh postgres          Up      5432/tcp
  harbor-jobservice   /harbor/start.sh                 Up
  harbor-log          /bin/sh -c /usr/local/bin/ ...   Up      127.0.0.1:1514->10514/tcp
  harbor-portal       nginx -g daemon off;             Up      80/tcp
  nginx               nginx -g daemon off;             Up      0.0.0.0:443->443/tcp, 0.0.0.0:4443->4443/tcp, 0.0.0.0:80->80/tcp
  redis               docker-entrypoint.sh redis ...   Up      6379/tcp
  registry            /entrypoint.sh /etc/regist ...   Up      5000/tcp
  registryctl         /harbor/start.sh                 Up
Using nginx or Load Balancing
If Harbor is running behind an nginx proxy or elastic load balancing, open the file common/config/nginx/nginx.conf and search for the following line.
proxy_set_header X-Forwarded-Proto $scheme;
If the proxy already has similar settings, remove it from the sections location /, location /v2/ and location /service/ and redeploy Harbor. For instructions about how to redeploy Harbor, see Reconfigure Harbor and Manage the Harbor Lifecycle.
Troubleshoot HTTPS Connections
If you use an intermediate certificate from a certificate issuer, merge the intermediate certificate with your own certificate to create a certificate bundle. Run the following command.
cat intermediate-certificate.pem >> yourdomain.com.crt
When the Docker daemon runs on certain operating systems, you might need to trust the certificate at the OS level. For example, run the following commands.
- Ubuntu:
cp yourdomain.com.crt /usr/local/share/ca-certificates/yourdomain.com.crt update-ca-certificates - Red Hat (CentOS etc):
cp yourdomain.com.crt /etc/pki/ca-trust/source/anchors/yourdomain.com.crt
update-ca-trust
Reconfigure Harbor and Manage the Harbor Lifecycle
You use docker-compose to manage the lifecycle of Harbor. This topic provides some useful commands. You must run the commands in the directory in which docker-compose.yml is located.
See the Docker Compose command-line reference for more information about docker-compose.
Stop Harbor
To stop Harbor, run the following command.
sudo docker-compose stop
Stopping nginx              ... done
Stopping harbor-portal      ... done
Stopping harbor-jobservice  ... done
Stopping harbor-core        ... done
Stopping registry           ... done
Stopping redis              ... done
Stopping registryctl        ... done
Stopping harbor-db          ... done
Stopping harbor-log         ... done
Restart Harbor
To restart Harbor, run the following command.
sudo docker-compose start
Starting log         ... done
Starting registry    ... done
Starting registryctl ... done
Starting postgresql  ... done
Starting core        ... done
Starting portal      ... done
Starting redis       ... done
Starting jobservice  ... done
Starting proxy       ... done
Reconfigure Harbor
To reconfigure Harbor, perform the following steps.
- Stop Harbor.
sudo docker-compose down -v - Update
harbor.yml.vim harbor.yml - Run the
preparescript to populate the configuration.sudo prepareTo reconfigure Harbor to install Notary, Trivy, and the chart repository service, include all of the components in the
preparecommand.sudo prepare --with-notary --with-trivy --with-chartmuseum - Re-create and start the Harbor instance.
sudo docker-compose up -d
Other Commands
Remove Harbor’s containers but keep all of the image data and Harbor’s database files in the file system:
sudo docker-compose down -v
Remove the Harbor database and image data before performing a clean re-installation:
rm -r /data/database
rm -r /data/registry
rm -r /data/redis